
Question-by-question working
Read the prompt, attempt it, then check each step
Every exercise subpart and table row is a separate item. Shared figures and table headings are repeated whenever they are needed to understand the question.
Detailed worked answers
Textbook page 136
Textbook page 136 · solved item 1
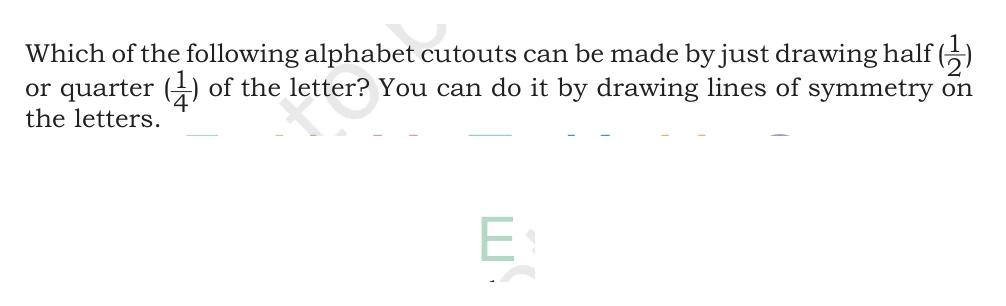
Can the letter E cutout be made by drawing only half or one quarter of it?
Show detailed solution
- Step 1: Imagine folding the letter E along a horizontal line and along a vertical line.
- Step 2: The letter has horizontal reflection symmetry.
- Step 3: No vertical line matches the left spine to the open right side.
- Answer: Draw one half of the letter.
Textbook page 136 · solved item 2
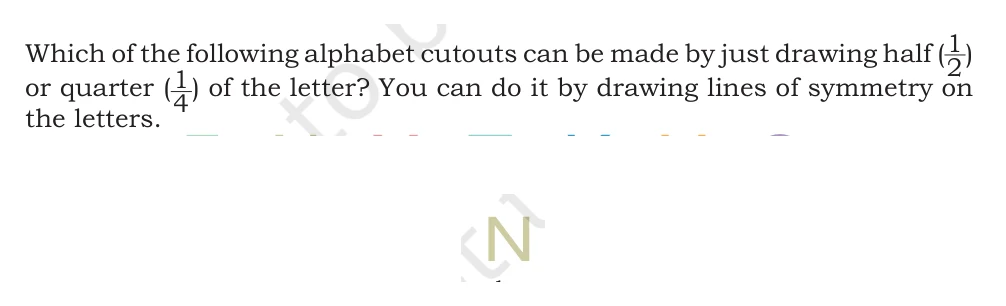
Can the letter N cutout be made by drawing only half or one quarter of it?
Show detailed solution
- Step 1: Imagine folding the letter N along a horizontal line and along a vertical line.
- Step 2: The letter has no reflection symmetry.
- Step 3: A horizontal or vertical fold changes the slanting middle stroke.
- Answer: No. The letter N cannot be completed from just one half or one quarter by reflection.
Textbook page 136 · solved item 3
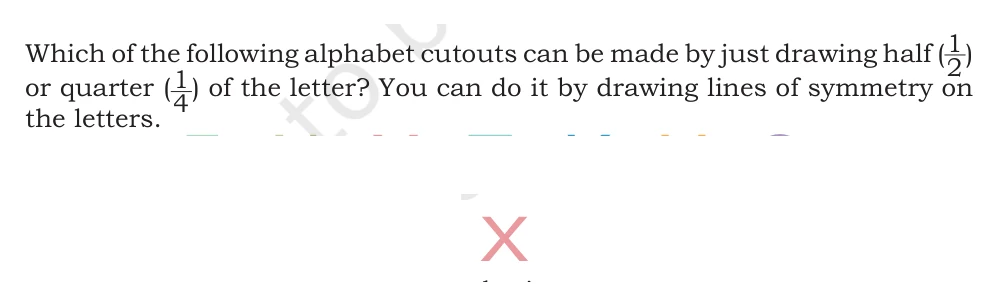
Can the letter X cutout be made by drawing only half or one quarter of it?
Show detailed solution
- Step 1: Imagine folding the letter X along a horizontal line and along a vertical line.
- Step 2: The letter has horizontal and vertical reflection symmetry.
- Step 3: The two crossing strokes match across both folds.
- Answer: Draw one quarter of the letter.
Textbook page 136 · solved item 4
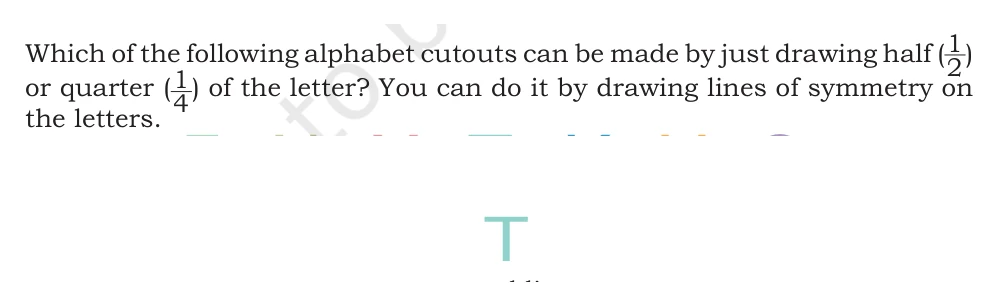
Can the letter T cutout be made by drawing only half or one quarter of it?
Show detailed solution
- Step 1: Imagine folding the letter T along a horizontal line and along a vertical line.
- Step 2: The letter has vertical reflection symmetry.
- Step 3: A horizontal fold moves the top bar to the bottom, so it does not match.
- Answer: Draw one half of the letter.
Textbook page 136 · solved item 5
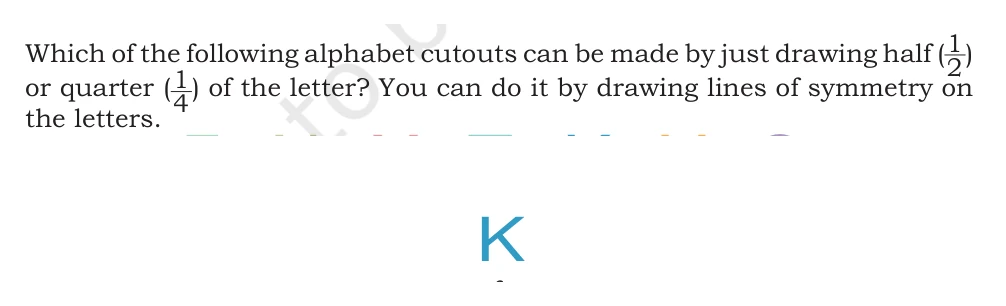
Can the letter K cutout be made by drawing only half or one quarter of it?
Show detailed solution
- Step 1: Imagine folding the letter K along a horizontal line and along a vertical line.
- Step 2: The letter has horizontal reflection symmetry.
- Step 3: The upper and lower slanting arms exchange places across a horizontal fold.
- Answer: Draw one half of the letter.
Textbook page 136 · solved item 6
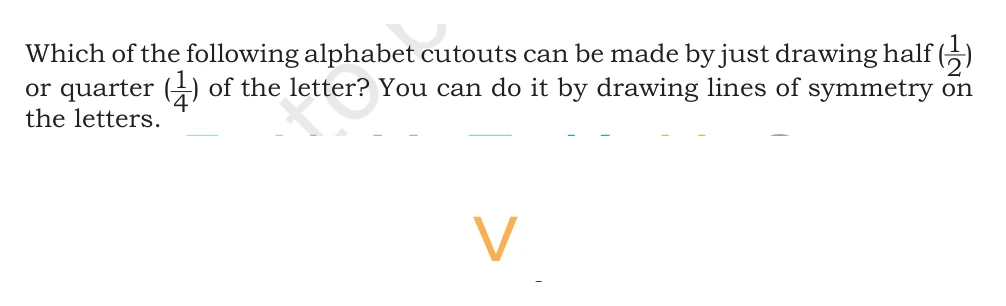
Can the letter V cutout be made by drawing only half or one quarter of it?
Show detailed solution
- Step 1: Imagine folding the letter V along a horizontal line and along a vertical line.
- Step 2: The letter has vertical reflection symmetry.
- Step 3: The two slanting sides exchange places across a vertical fold.
- Answer: Draw one half of the letter.
Textbook page 136 · solved item 7
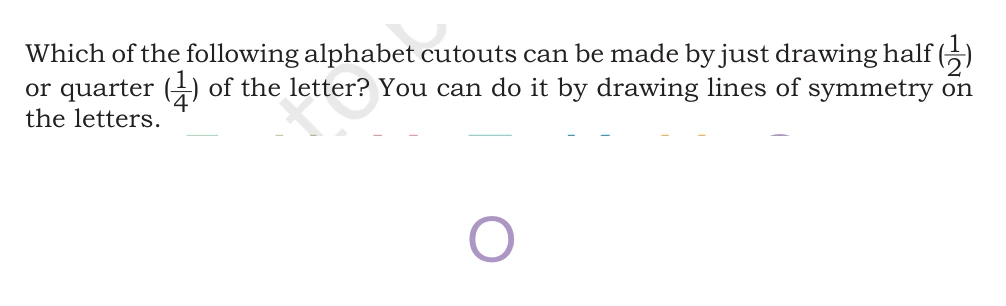
Can the letter O cutout be made by drawing only half or one quarter of it?
Show detailed solution
- Step 1: Imagine folding the letter O along a horizontal line and along a vertical line.
- Step 2: The letter has horizontal and vertical reflection symmetry.
- Step 3: The rounded outline matches across both folds.
- Answer: Draw one quarter of the letter.
Textbook page 136 · solved item 8

Which letters have a horizontal line of symmetry?
Show detailed solution
- Step 1: Check whether the top and bottom parts exchange and match across a horizontal fold.
- Step 2: E and K match because their upper and lower arms are paired.
- Step 3: X and O also match across the horizontal centre line.
- Answer: E, X, K, and O.
Textbook page 136 · solved item 9

Which letters have a vertical line of symmetry?
Show detailed solution
- Step 1: Check whether the left and right parts match across a vertical fold.
- Step 2: X and O have matching parts on both sides.
- Step 3: T and V also have equal left and right halves.
- Answer: X, T, V, and O.
Textbook page 136 · solved item 10

Which letters have both vertical and horizontal lines of symmetry?
Show detailed solution
- Step 1: A letter must match after both a left-right fold and a top-bottom fold.
- Step 2: X passes both fold checks.
- Step 3: O also passes both fold checks.
- Answer: X and O.
Textbook page 136 · solved item 11
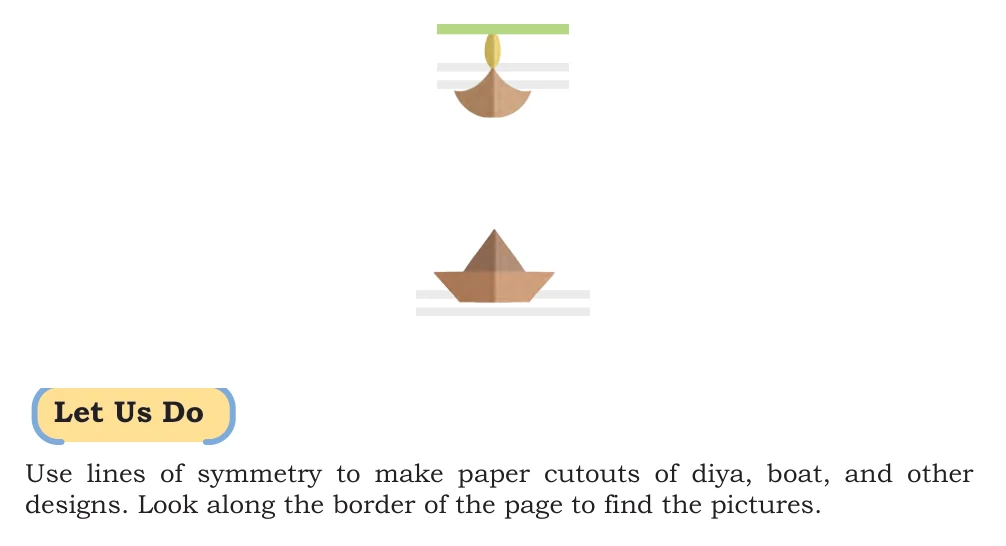
Use lines of symmetry to make paper cutouts of a diya, a boat, and another border design.
Show detailed solution
- Step 1: Choose a border picture with a clear line of symmetry, such as the diya or boat with a vertical centre line.
- Step 2: Fold the paper on that centre line and draw only one half of the outline beside the fold.
- Step 3: Cut through both layers along the outline while keeping the folded edge joined.
- Answer: Open the paper to get a complete cutout whose two halves are mirror images.
Detailed worked answers
Textbook page 137
Textbook page 137 · solved item 12
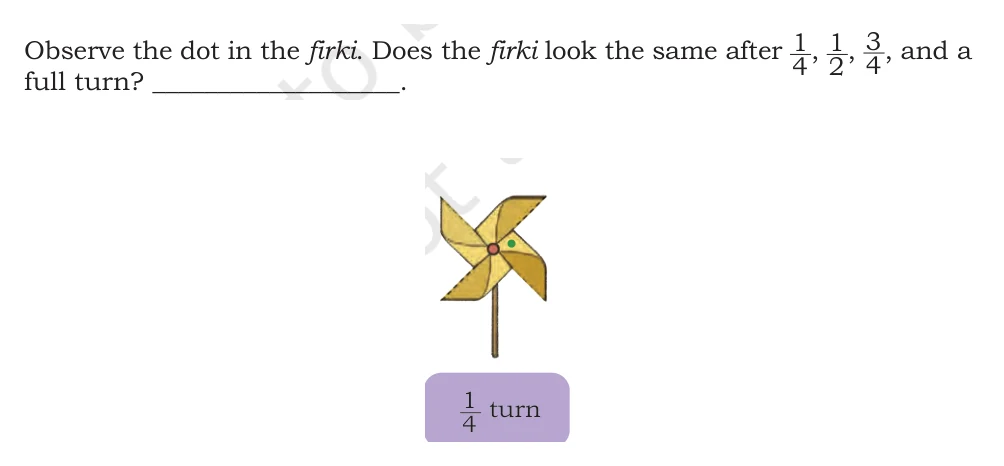
Does the firki look the same after \frac{1}{4} turn?
Show detailed solution
- Step 1: The firki has four blades of the same shape and size, equally spaced around its centre.
- Step 2: The marked dot moves to the next blade position.
- Step 3: Each blade now lies exactly where another identical blade was before.
- Answer: Yes, the firki looks the same.
Textbook page 137 · solved item 13
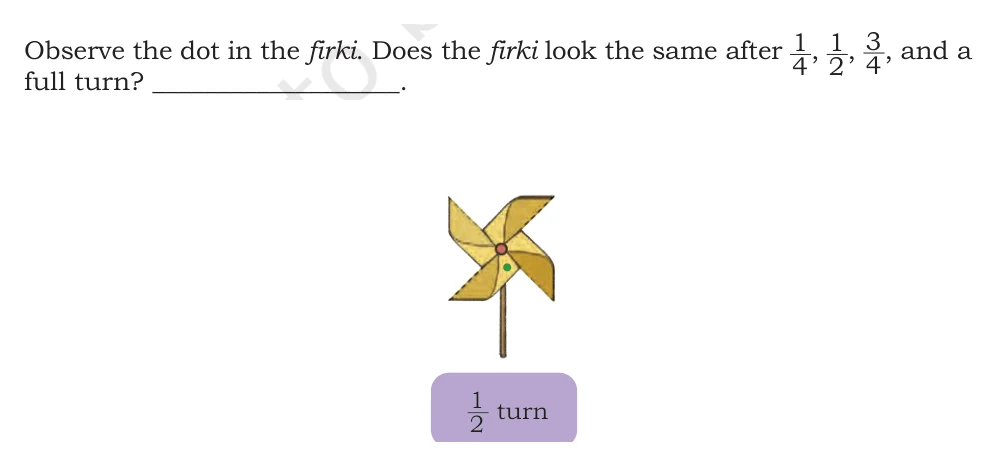
Does the firki look the same after \frac{1}{2} turn?
Show detailed solution
- Step 1: The firki has four blades of the same shape and size, equally spaced around its centre.
- Step 2: The marked dot moves to the opposite blade position.
- Step 3: Each blade now lies exactly where another identical blade was before.
- Answer: Yes, the firki looks the same.
Textbook page 137 · solved item 14
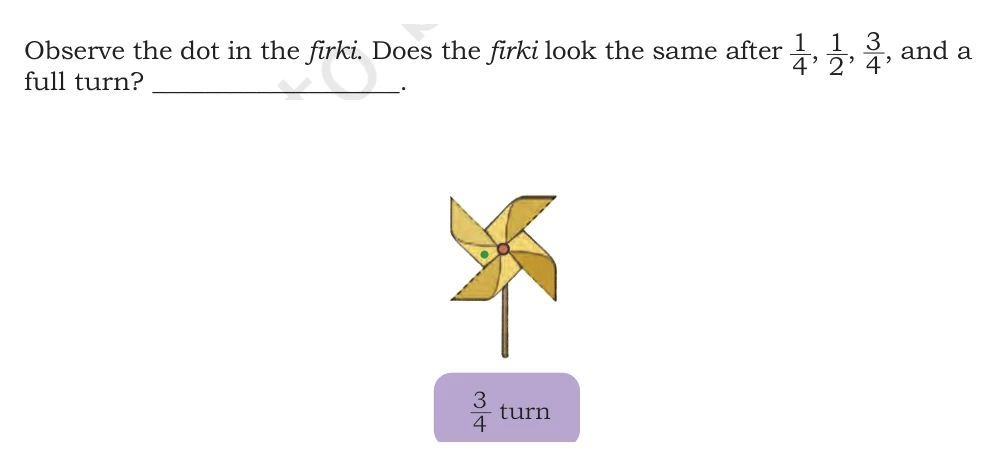
Does the firki look the same after \frac{3}{4} turn?
Show detailed solution
- Step 1: The firki has four blades of the same shape and size, equally spaced around its centre.
- Step 2: The marked dot moves to the third blade position.
- Step 3: Each blade now lies exactly where another identical blade was before.
- Answer: Yes, the firki looks the same.
Textbook page 137 · solved item 15
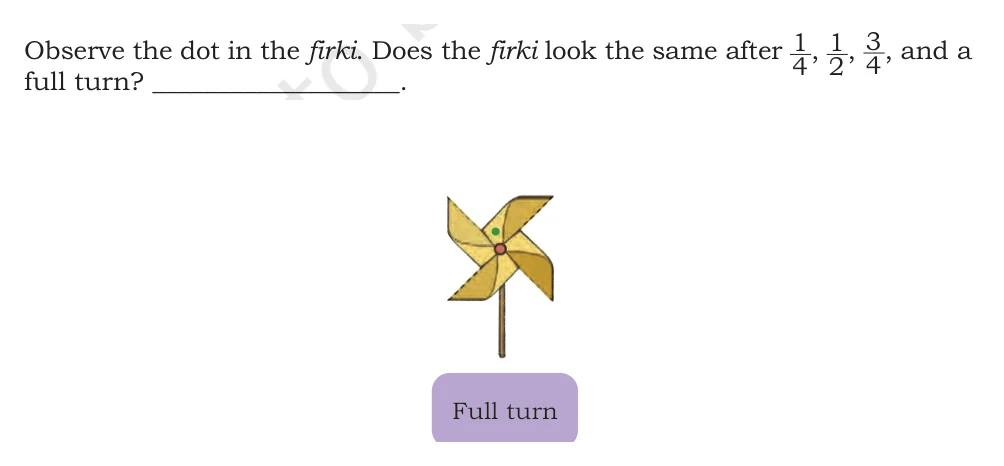
Does the firki look the same after one full turn?
Show detailed solution
- Step 1: The firki has four blades of the same shape and size, equally spaced around its centre.
- Step 2: The marked dot returns to its starting position.
- Step 3: Each blade now lies exactly where another identical blade was before.
- Answer: Yes, the firki looks the same.
Detailed worked answers
Textbook page 138
Textbook page 138 · solved item 16
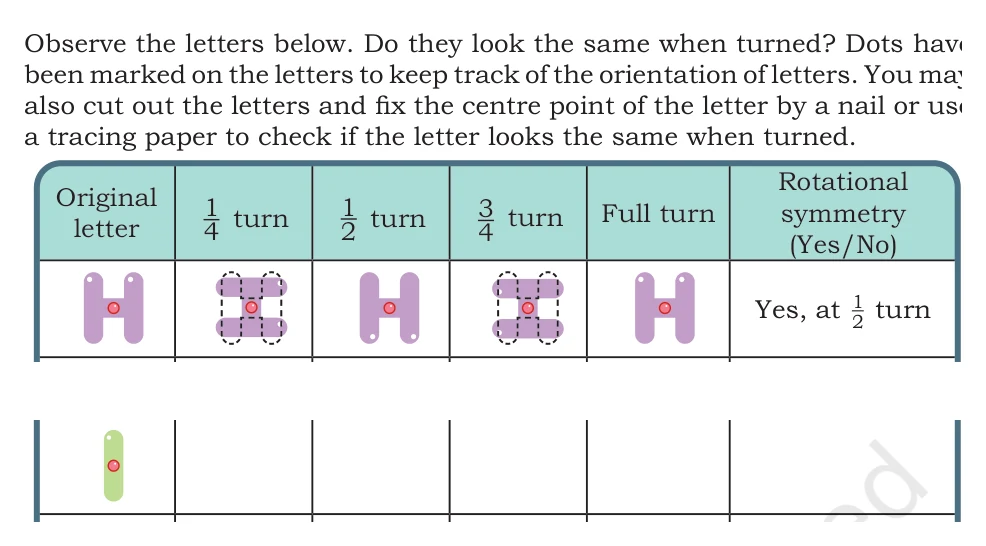
Complete the rotational-symmetry table row for the letter I.
Show detailed solution
- Step 1: After a \frac{1}{4} turn: No.
- Step 2: After a \frac{1}{2} turn: Yes; after a \frac{3}{4} turn: No.
- Step 3: After a full turn: Yes, because every shape returns to its starting position.
- Answer: Rotational symmetry - Yes, at a one-half turn.
Textbook page 138 · solved item 17
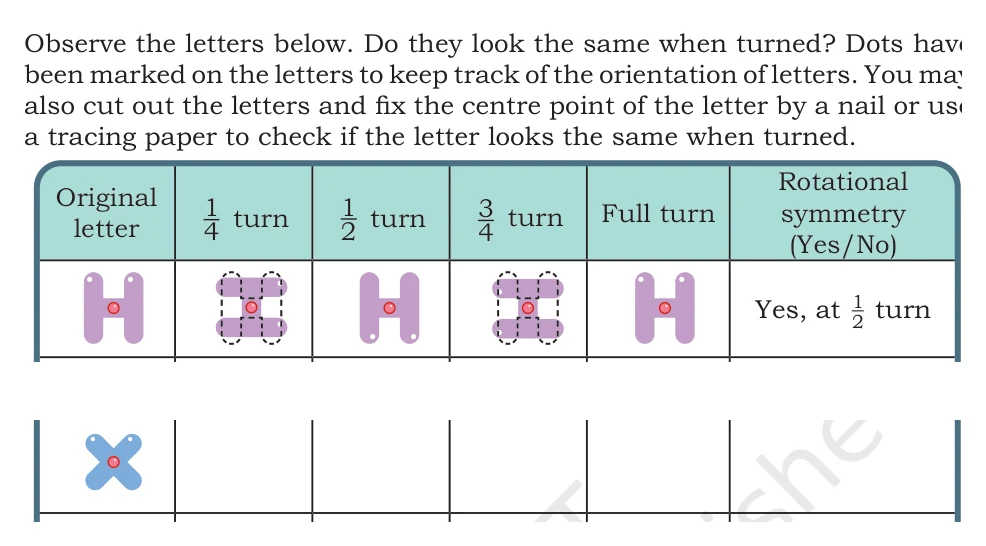
Complete the rotational-symmetry table row for the letter X.
Show detailed solution
- Step 1: After a \frac{1}{4} turn: Yes.
- Step 2: After a \frac{1}{2} turn: Yes; after a \frac{3}{4} turn: Yes.
- Step 3: After a full turn: Yes, because every shape returns to its starting position.
- Answer: Rotational symmetry - Yes, at every one-quarter turn.
Textbook page 138 · solved item 18
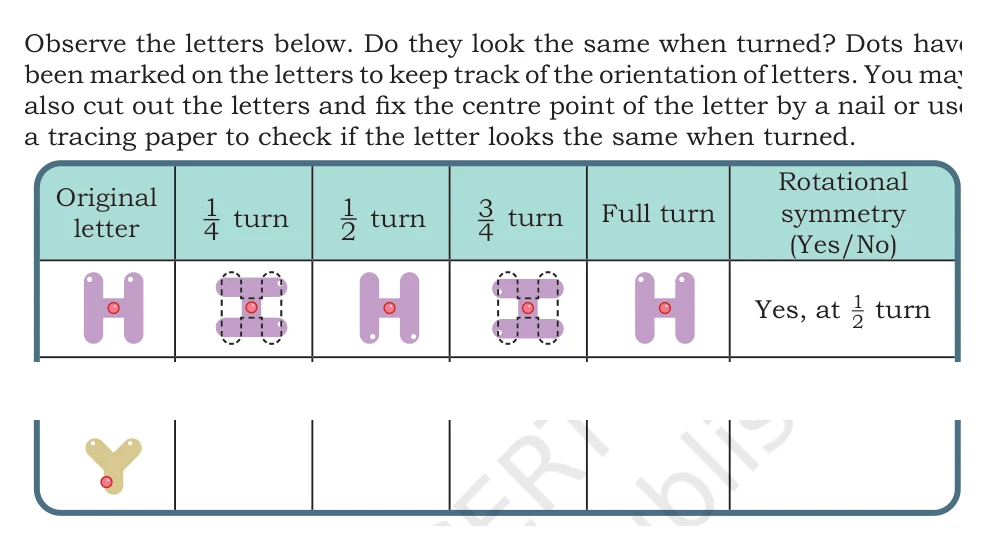
Complete the rotational-symmetry table row for the letter Y.
Show detailed solution
- Step 1: After a \frac{1}{4} turn: No.
- Step 2: After a \frac{1}{2} turn: No; after a \frac{3}{4} turn: No.
- Step 3: After a full turn: Yes, because every shape returns to its starting position.
- Answer: Rotational symmetry - No.
Textbook page 138 · solved item 19
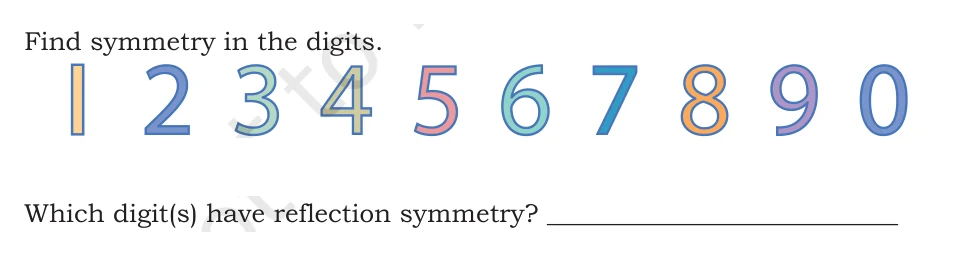
Which shown digits have reflection symmetry?
Show detailed solution
- Step 1: Imagine folding each printed digit across possible horizontal or vertical centre lines.
- Step 2: The straight 1 matches across its centre lines, and the 3 matches across a horizontal line.
- Step 3: The 8 and 0 also have matching halves across their centre lines.
- Answer: 1, 3, 8, and 0.
Textbook page 138 · solved item 20
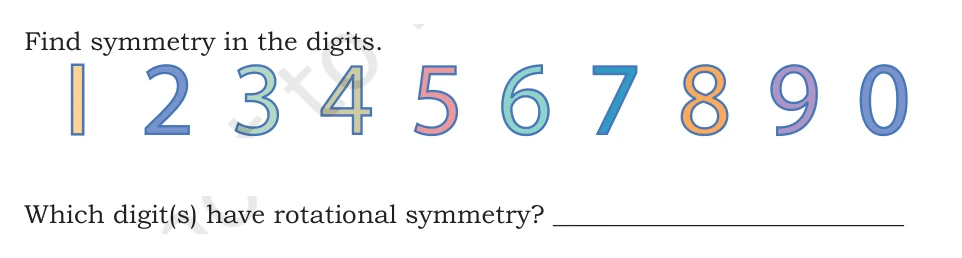
Which shown digits have rotational symmetry?
Show detailed solution
- Step 1: Turn each printed digit through one half of a full turn.
- Step 2: The straight 1, the 8, and the 0 still have the same outline.
- Step 3: Every other shown digit changes shape or direction.
- Answer: 1, 8, and 0.
Textbook page 138 · solved item 21
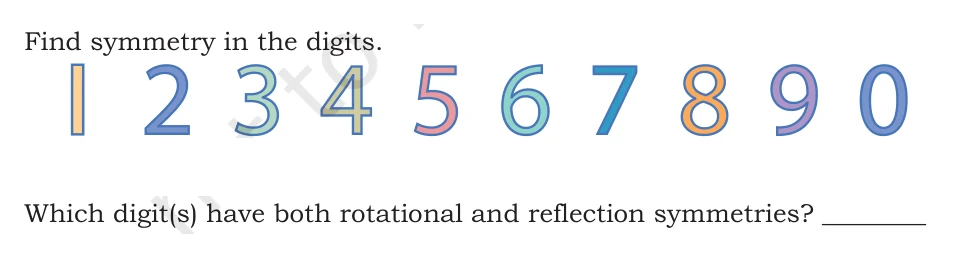
Which shown digits have both rotational and reflection symmetry?
Show detailed solution
- Step 1: Start with the digits that have reflection symmetry: 1, 3, 8, and 0.
- Step 2: Test those four with a one-half turn.
- Step 3: The 3 fails the turn test, while 1, 8, and 0 pass both tests.
- Answer: 1, 8, and 0.
Textbook page 138 · solved item 22
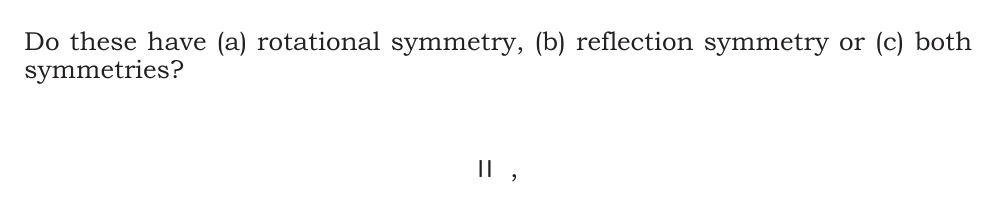
Does the number 11 have rotational symmetry, reflection symmetry, or both?
Show detailed solution
- Step 1: A vertical fold exchanges the two identical digits, while a horizontal fold keeps each straight digit unchanged.
- Step 2: A one-half turn exchanges the two identical 1s.
- Step 3: The whole number still reads and looks like 11 after these checks.
- Answer: 11 has both rotational and reflection symmetry.
Textbook page 138 · solved item 23
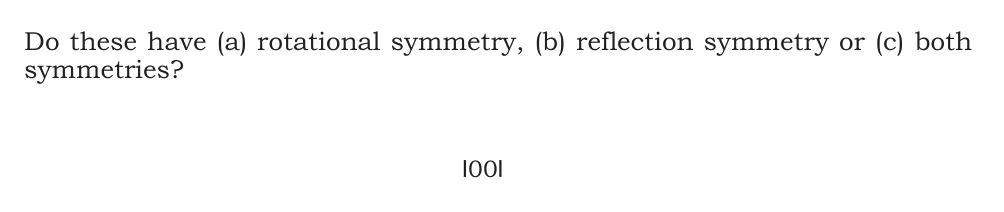
Does the number 1001 have rotational symmetry, reflection symmetry, or both?
Show detailed solution
- Step 1: A vertical fold exchanges the outside 1s and the inside 0s.
- Step 2: A horizontal fold keeps every printed 1 and 0 unchanged.
- Step 3: A one-half turn also swaps equal outside and inside digits, so the full number matches.
- Answer: 1001 has both rotational and reflection symmetry.
Textbook page 138 · solved item 24

Give an example of a 2-digit number with rotational symmetry but not reflection symmetry.
Show detailed solution
- Step 1: Try 69 using the shapes of the digits printed on this page.
- Step 2: A half turn changes 6 into 9 and 9 into 6; their places also exchange.
- Step 3: A mirror does not make the same pair.
- Answer: 69 is one correct example.
Textbook page 138 · solved item 25

Give an example of a 2-digit number with reflection symmetry but not rotational symmetry.
Show detailed solution
- Step 1: Try 33 using the shapes of the digits printed on this page.
- Step 2: Each printed 3 matches across a horizontal line.
- Step 3: A half turn reverses both 3s.
- Answer: 33 is one correct example.
Textbook page 138 · solved item 26

Give an example of a 2-digit number with both symmetries.
Show detailed solution
- Step 1: Try 11 using the shapes of the digits printed on this page.
- Step 2: The two straight digits match across horizontal and vertical folds.
- Step 3: A half turn exchanges two identical digits.
- Answer: 11 is one correct example.
Textbook page 138 · solved item 27

Give an example of a 3-digit number with rotational symmetry but not reflection symmetry.
Show detailed solution
- Step 1: Try 609 using the shapes of the digits printed on this page.
- Step 2: A half turn exchanges 6 and 9 while 0 stays in the middle.
- Step 3: A mirror does not keep the 6 and 9 shapes unchanged.
- Answer: 609 is one correct example.
Textbook page 138 · solved item 28

Give an example of a 3-digit number with reflection symmetry but not rotational symmetry.
Show detailed solution
- Step 1: Try 303 using the shapes of the digits printed on this page.
- Step 2: Every digit matches across a horizontal centre line.
- Step 3: A half turn reverses the two 3s.
- Answer: 303 is one correct example.
Textbook page 138 · solved item 29

Give an example of a 3-digit number with both symmetries.
Show detailed solution
- Step 1: Try 101 using the shapes of the digits printed on this page.
- Step 2: A vertical fold exchanges the outside 1s and keeps 0 in the middle.
- Step 3: A horizontal fold and a half turn also keep the whole number unchanged.
- Answer: 101 is one correct example.
Textbook page 138 · solved item 30

Give an example of a 4-digit number with rotational symmetry but not reflection symmetry.
Show detailed solution
- Step 1: Try 6009 using the shapes of the digits printed on this page.
- Step 2: A half turn exchanges the outside 6 and 9 and the two middle 0s.
- Step 3: A mirror does not keep the outside digits unchanged.
- Answer: 6009 is one correct example.
Textbook page 138 · solved item 31

Give an example of a 4-digit number with reflection symmetry but not rotational symmetry.
Show detailed solution
- Step 1: Try 3003 using the shapes of the digits printed on this page.
- Step 2: Every digit matches across a horizontal centre line.
- Step 3: A half turn reverses the two 3s.
- Answer: 3003 is one correct example.
Textbook page 138 · solved item 32

Give an example of a 4-digit number with both symmetries.
Show detailed solution
- Step 1: Try 1001 using the shapes of the digits printed on this page.
- Step 2: A vertical fold exchanges equal outside and inside digits.
- Step 3: A horizontal fold and a half turn also keep the whole number unchanged.
- Answer: 1001 is one correct example.
Detailed worked answers
Textbook page 139
Textbook page 139 · solved item 33
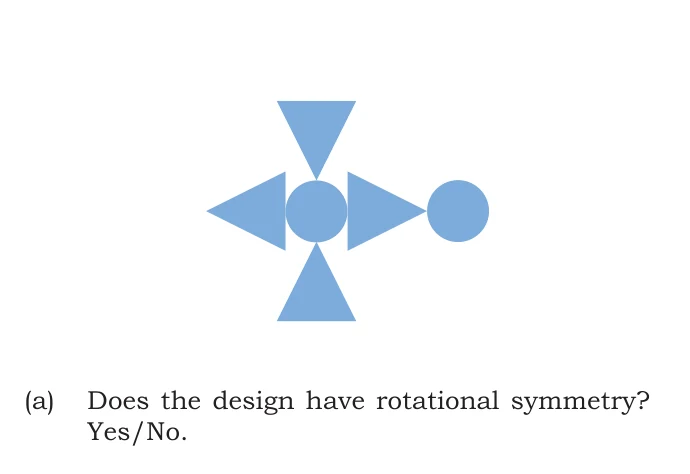
Does the given blue design have rotational symmetry?
Show detailed solution
- Step 1: Turn the design through one half of a full turn around the middle circle.
- Step 2: The four triangles exchange matching positions, but the extra circle on the right moves to the empty left side.
- Step 3: The turned design therefore does not cover the original design exactly.
- Answer: No, the given design does not have rotational symmetry.
Textbook page 139 · solved item 34
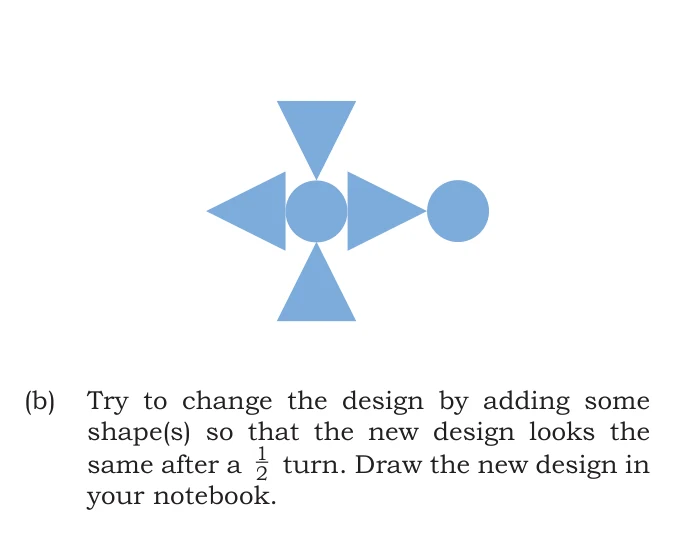
Add shapes so the blue design looks the same after a \frac{1}{2} turn.
Show detailed solution
- Step 1: Notice the extra blue circle beyond the triangle on the right.
- Step 2: After a half turn, that circle would need a matching circle in the same position on the left.
- Step 3: Draw one equal blue circle beyond the left triangle, at the same distance from the centre.
- Answer: Add a matching circle at the left end; the two end circles exchange after a half turn.
Textbook page 139 · solved item 35
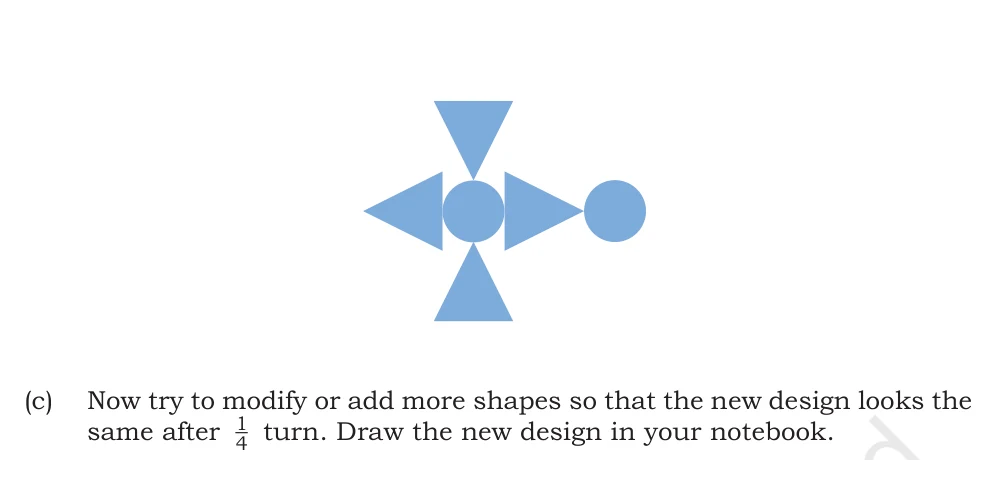
Add or modify shapes so the blue design looks the same after every \frac{1}{4} turn.
Show detailed solution
- Step 1: A quarter turn moves the right end to the bottom, then left, then top.
- Step 2: Keep the given right circle and add equal circles beyond the top, left, and bottom triangles.
- Step 3: Place every new circle the same distance from the middle.
- Answer: Use one matching outer circle at each of the four ends.
Textbook page 139 · solved item 36
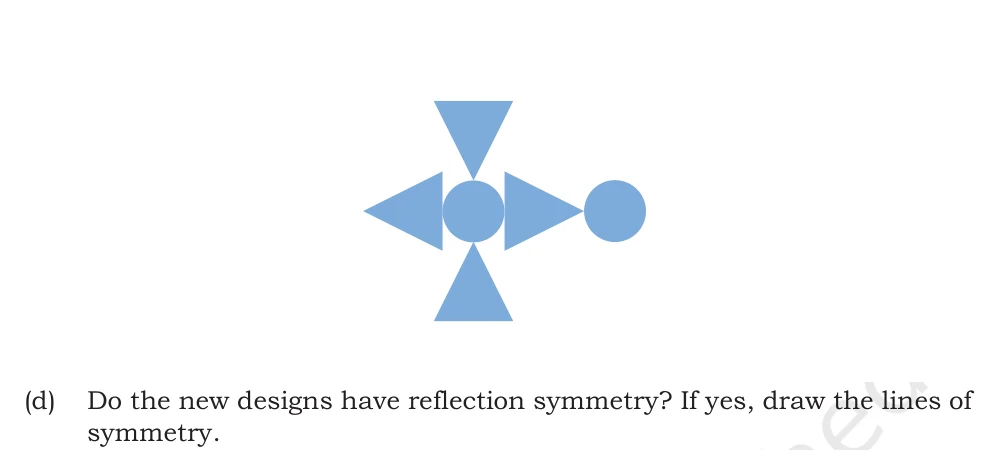
Do the new half-turn and quarter-turn designs have reflection symmetry?
Show detailed solution
- Step 1: In the half-turn design, the added left circle matches the right circle.
- Step 2: That design has horizontal and vertical lines of symmetry through its centre.
- Step 3: In the quarter-turn design, all four outer circles match; horizontal, vertical, and both diagonal centre lines work.
- Answer: Yes. Draw 2 lines on the half-turn design and 4 lines on the quarter-turn design.
Textbook page 139 · solved item 37
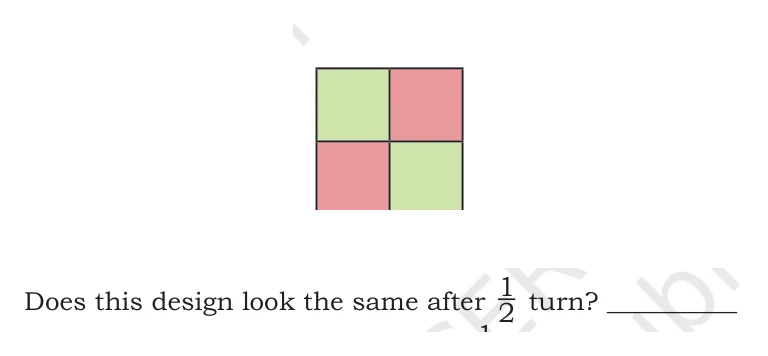
Does the two-colour square look the same after a \frac{1}{2} turn?
Show detailed solution
- Step 1: A half turn moves the top-left green square to the bottom-right green square.
- Step 2: It also moves the top-right pink square to the bottom-left pink square.
- Step 3: Every small square lands on the same colour.
- Answer: Yes, it looks the same after a one-half turn.
Textbook page 139 · solved item 38
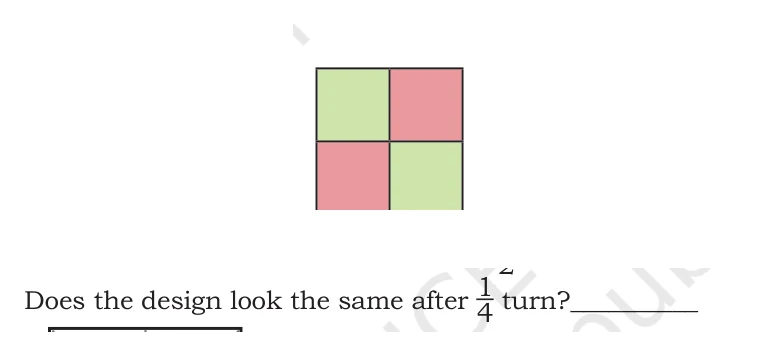
Does the two-colour square look the same after a \frac{1}{4} turn?
Show detailed solution
- Step 1: A quarter turn moves the top-left green square to the top-right position.
- Step 2: That position is pink in the original design.
- Step 3: Because the colours do not land on matching colours, the designs differ.
- Answer: No, it does not look the same after a one-quarter turn.
Textbook page 139 · solved item 39
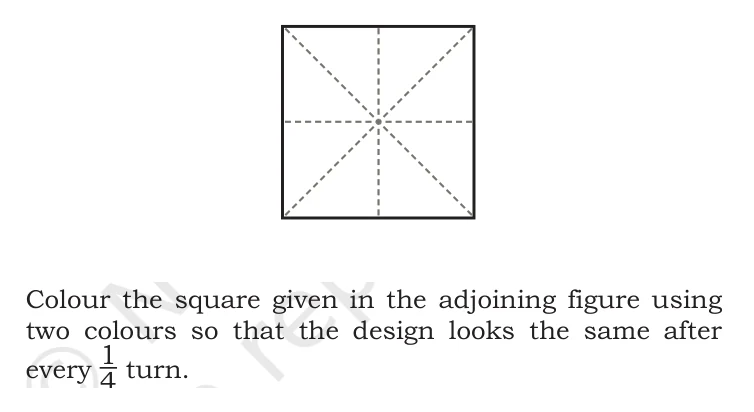
Colour the eight-part square with two colours so it looks the same after every \frac{1}{4} turn.
Show detailed solution
- Step 1: Start at the top and colour the small triangular regions alternately blue and yellow as you go around the centre.
- Step 2: This makes four blue regions and four yellow regions in an alternating ring.
- Step 3: A quarter turn moves each colour forward by two regions, so blue lands on blue and yellow lands on yellow.
- Answer: An alternating two-colour pinwheel is one correct design.
Textbook page 139 · solved item 40
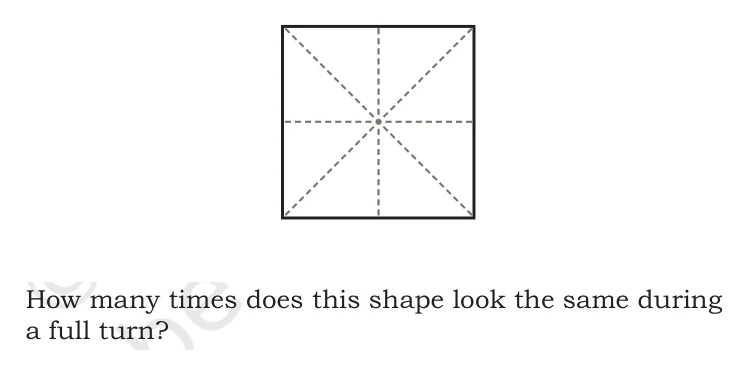
How many times does the coloured square look the same during one full turn?
Show detailed solution
- Step 1: It matches after one-quarter turn.
- Step 2: It also matches after one-half turn and three-quarter turn.
- Step 3: At one full turn it returns to the starting position.
- Answer: It looks the same 4 times during a full turn.
Textbook page 139 · solved item 41
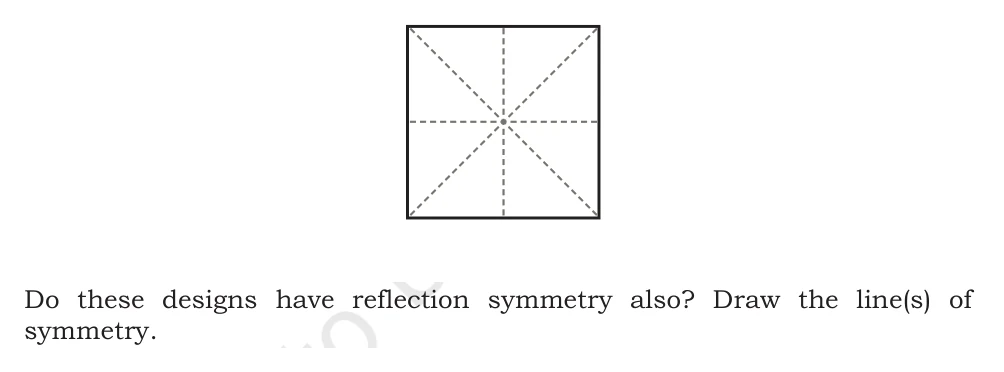
Does the alternating two-colour square also have reflection symmetry?
Show detailed solution
- Step 1: Try the horizontal, vertical, and diagonal fold lines of the square.
- Step 2: Each fold places a blue triangular region on a yellow one.
- Step 3: The colours do not match even though the outlines do.
- Answer: No, this alternating design has rotational symmetry but not reflection symmetry.
Textbook page 139 · solved item 42
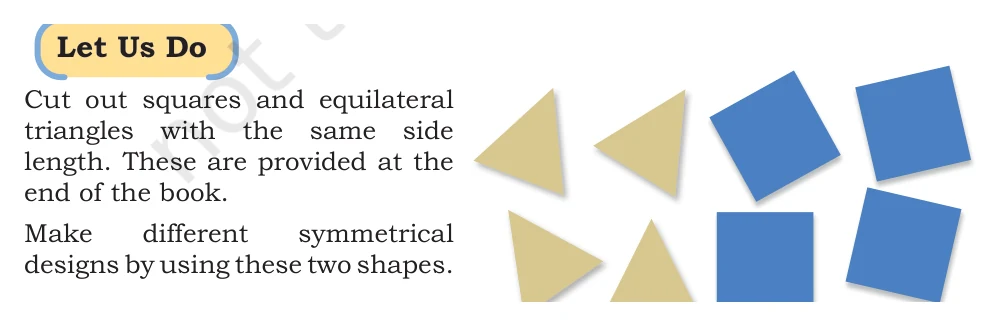
Make symmetrical designs using the given equal-sided squares and equilateral triangles.
Show detailed solution
- Step 1: Place one square or triangle and choose a centre or fold line for the design.
- Step 2: Repeat each piece at equal distances on the other side of the fold line, or repeat it around the centre.
- Step 3: Trace or fold the finished arrangement to check that matching pieces cover one another.
- Answer: Many designs are possible; a correct design must repeat equal pieces in matching positions.
Detailed worked answers
Textbook page 140
Textbook page 140 · solved item 43
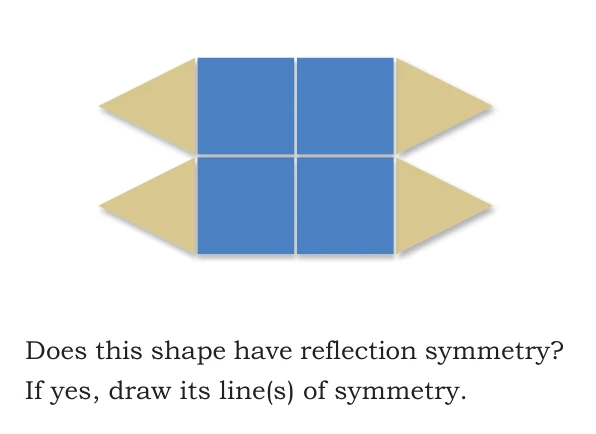
Does the square-and-triangle design have reflection symmetry? Draw its lines.
Show detailed solution
- Step 1: A vertical fold exchanges the matching left and right triangles and the two square columns.
- Step 2: A horizontal fold exchanges the matching top and bottom rows.
- Step 3: A diagonal fold would not keep the side triangles in matching positions.
- Answer: Yes. Draw 2 lines of symmetry: one vertical and one horizontal.
Textbook page 140 · solved item 44
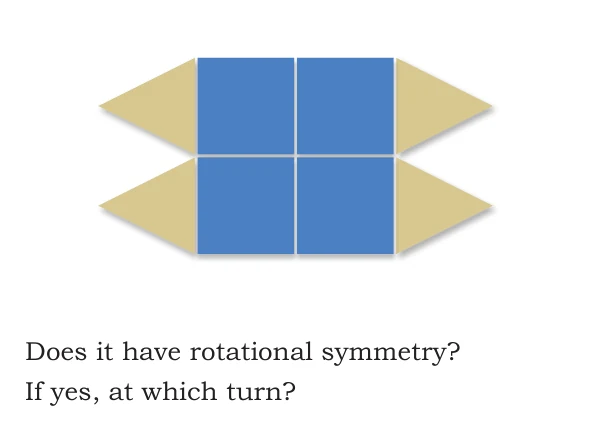
Does the square-and-triangle design have rotational symmetry? At which turn?
Show detailed solution
- Step 1: Turn the design through one-quarter of a full turn; the side triangles move to the top and bottom, so it does not match.
- Step 2: Turn it through one-half of a full turn.
- Step 3: The top and bottom rows exchange, and the left and right triangles exchange exactly.
- Answer: Yes, at a one-half turn.
Textbook page 140 · solved item 45
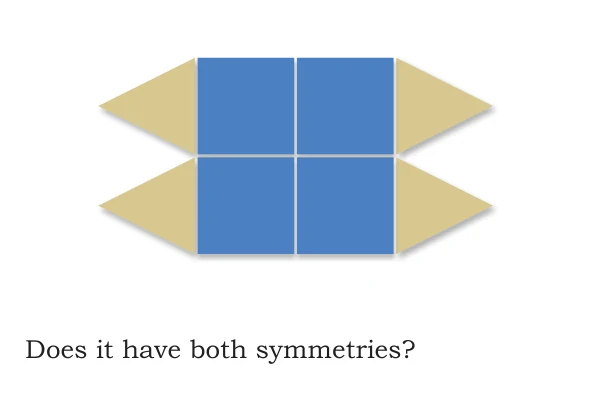
Does the square-and-triangle design have both reflection and rotational symmetry?
Show detailed solution
- Step 1: It has vertical and horizontal reflection lines.
- Step 2: It also matches after a one-half turn.
- Step 3: Passing both checks means it has both kinds of symmetry.
- Answer: Yes, it has both reflection and rotational symmetry.
Textbook page 140 · solved item 46

Make your own designs and sort them into the three symmetry categories.
Show detailed solution
- Step 1: Put a pinwheel-like design that matches only after a turn in the 'only rotational' group.
- Step 2: Put a single isosceles triangle, which has one fold line but no smaller matching turn, in the 'only reflection' group.
- Step 3: Put a square or the shown square-and-triangle design in the 'both' group.
- Answer: Sort by testing every design with a fold and with a turn; other correct examples are possible.
Textbook page 140 · solved item 47
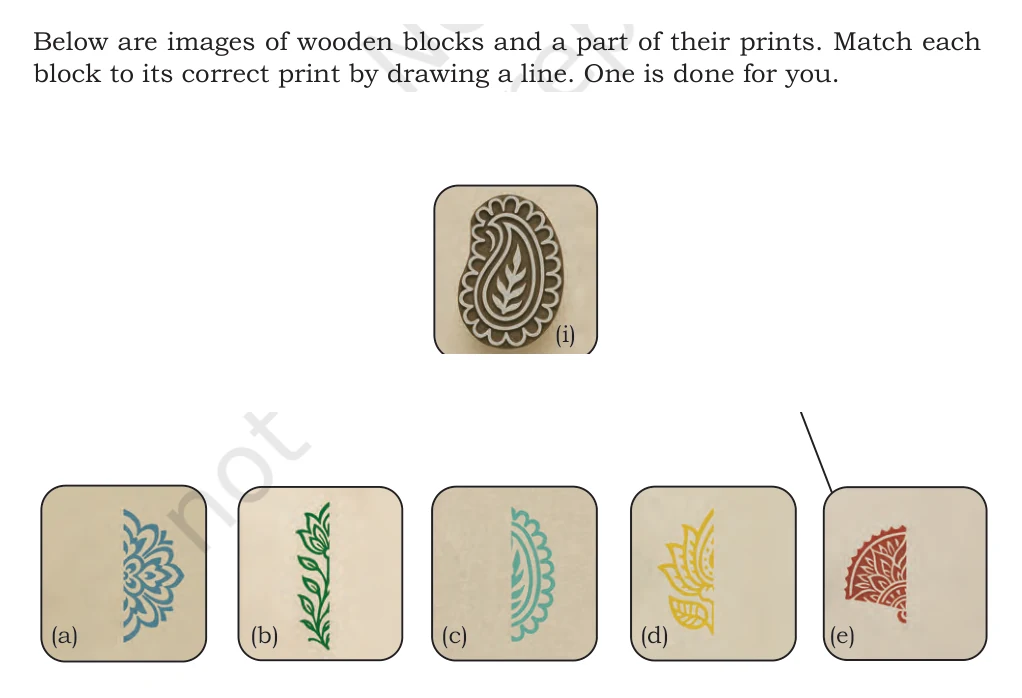
Match wooden block (i) to its correct partial print.
Show detailed solution
- Step 1: Look at the outer boundary and the main inside marks on the wooden block.
- Step 2: Find the option showing the same curved paisley edge and its scalloped border.
- Step 3: Ignore the ink colour because the carved shape, not the colour, decides the match.
- Answer: wooden block (i) matches print (c).
Textbook page 140 · solved item 48
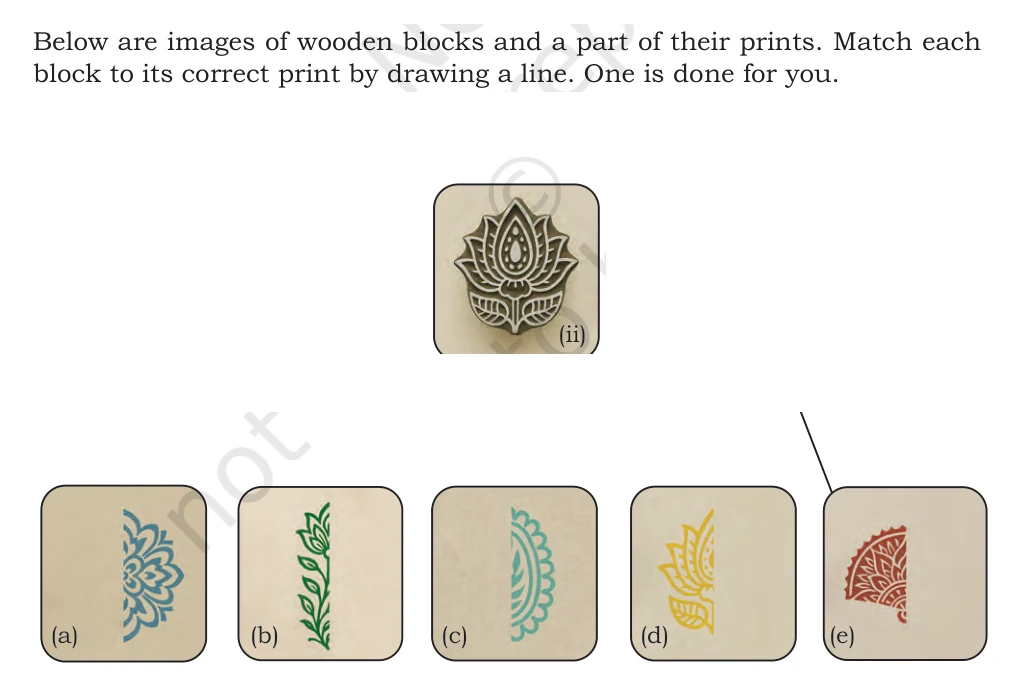
Match wooden block (ii) to its correct partial print.
Show detailed solution
- Step 1: Look at the outer boundary and the main inside marks on the wooden block.
- Step 2: Find the option showing the same lotus petals, dotted centre, and leaf at the base.
- Step 3: Ignore the ink colour because the carved shape, not the colour, decides the match.
- Answer: wooden block (ii) matches print (d).
Textbook page 140 · solved item 49
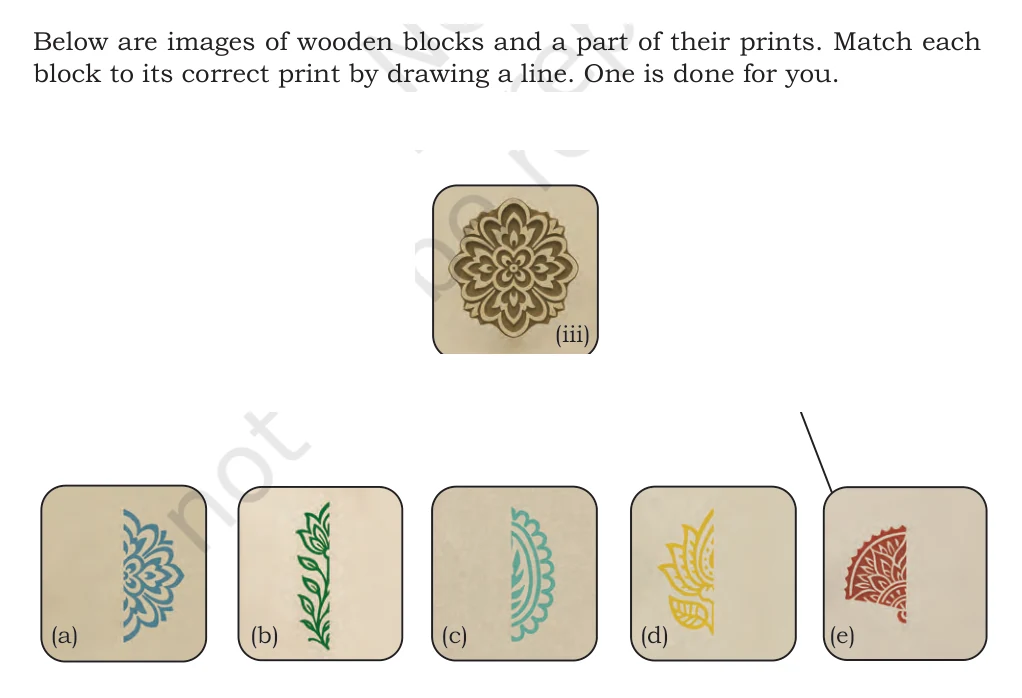
Match wooden block (iii) to its correct partial print.
Show detailed solution
- Step 1: Look at the outer boundary and the main inside marks on the wooden block.
- Step 2: Find the option showing the same half of the round layered flower.
- Step 3: Ignore the ink colour because the carved shape, not the colour, decides the match.
- Answer: wooden block (iii) matches print (a).
Textbook page 140 · solved item 50
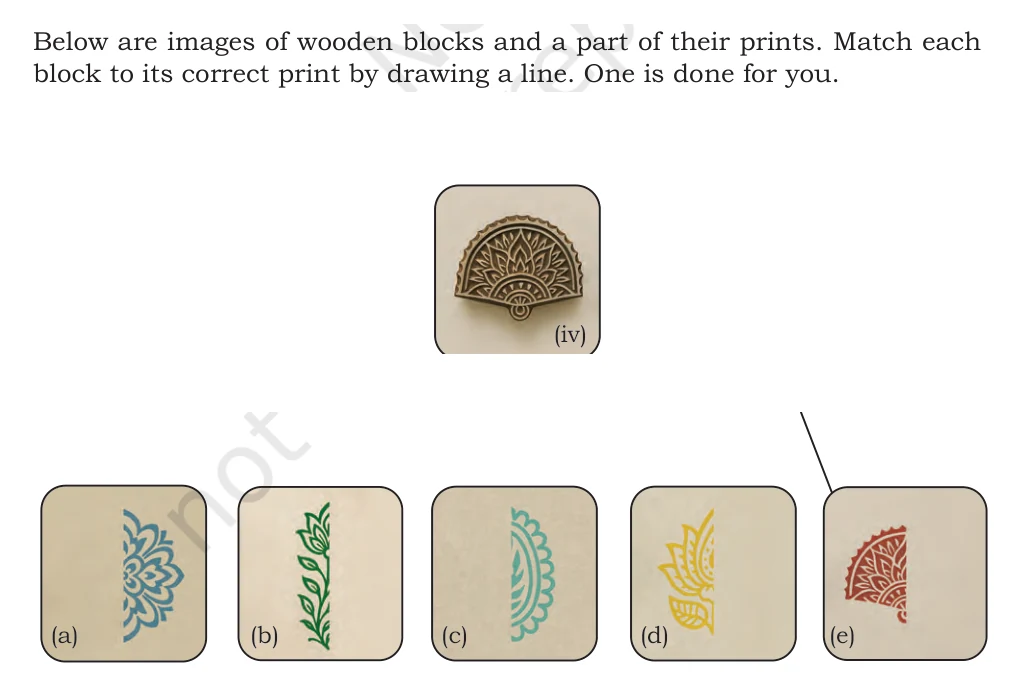
Match wooden block (iv) to its correct partial print.
Show detailed solution
- Step 1: Look at the outer boundary and the main inside marks on the wooden block.
- Step 2: Find the option showing the same fan-shaped layers and small circle at the bottom.
- Step 3: Ignore the ink colour because the carved shape, not the colour, decides the match.
- Answer: wooden block (iv) matches print (e).
Textbook page 140 · solved item 51
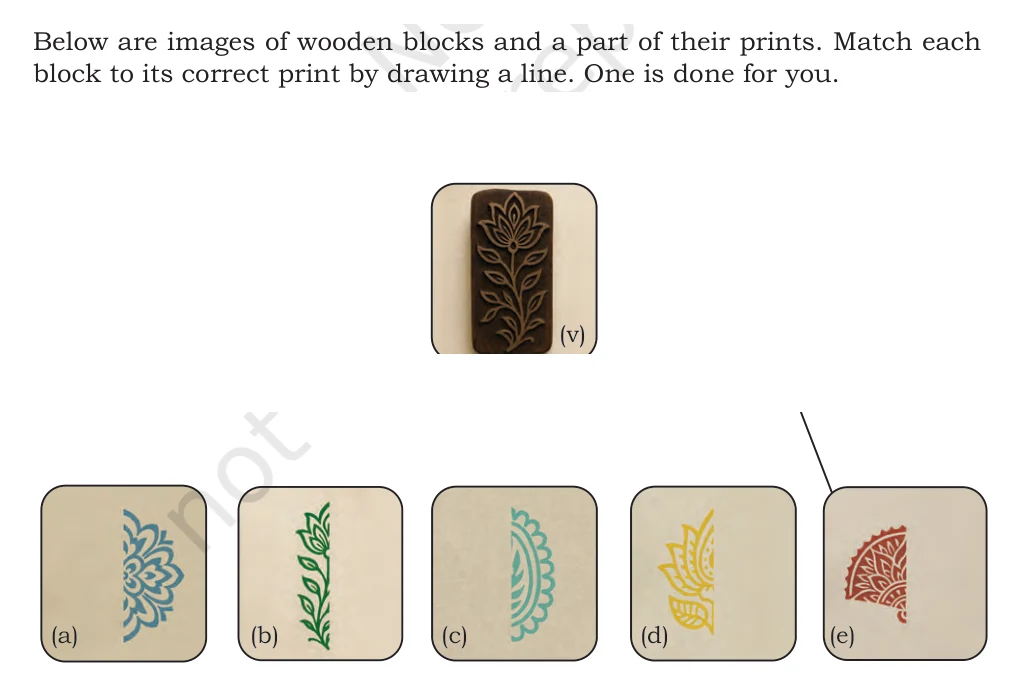
Match wooden block (v) to its correct partial print.
Show detailed solution
- Step 1: Look at the outer boundary and the main inside marks on the wooden block.
- Step 2: Find the option showing the same long stem with leaves on both sides.
- Step 3: Ignore the ink colour because the carved shape, not the colour, decides the match.
- Answer: wooden block (v) matches print (b).
Detailed worked answers
Textbook page 141
Textbook page 141 · solved item 52
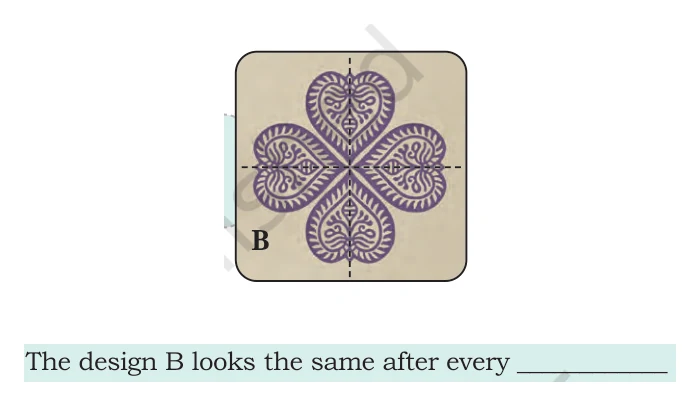
After what fraction of a turn does design B look the same?
Show detailed solution
- Step 1: The design has four equal heart prints placed at equal gaps around the centre.
- Step 2: A one-quarter turn moves each heart to the next heart's position.
- Step 3: Every heart then covers an identical heart.
- Answer: Design B looks the same after every \frac{1}{4} turn.
Textbook page 141 · solved item 53
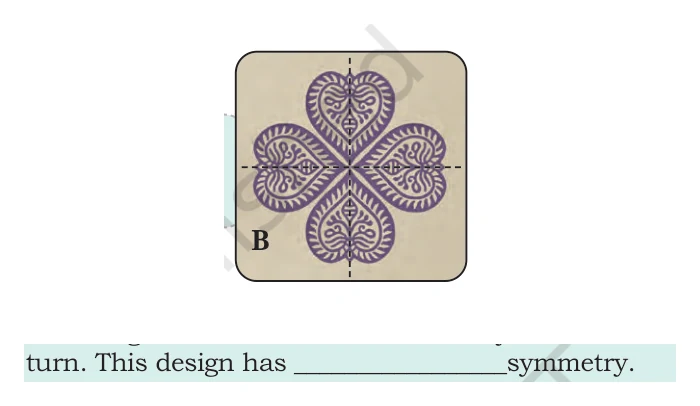
What type of symmetry does design B have because it matches after a turn?
Show detailed solution
- Step 1: Reflection symmetry is checked by flipping or folding.
- Step 2: Here the design is checked by turning it around its centre.
- Step 3: Matching after a turn is the meaning of rotational symmetry.
- Answer: Design B has rotational symmetry.
Textbook page 141 · solved item 54
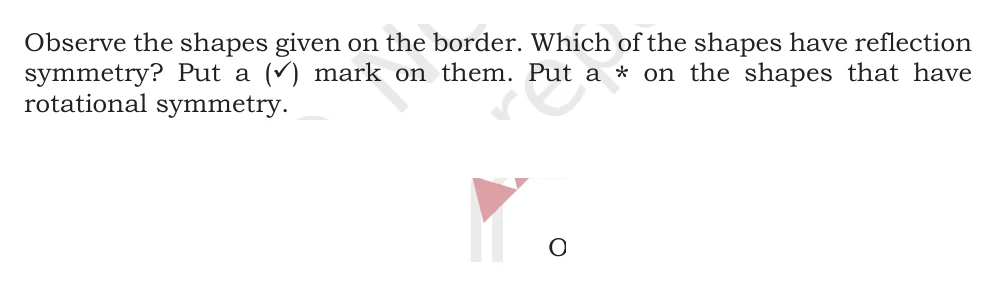
Classify the top-left pink three-triangle pinwheel on the page border.
Show detailed solution
- Step 1: Reflection check: A mirror reverses the direction of the pinwheel.
- Step 2: Rotational check: it matches after \frac{1}{3} turn.
- Step 3: Use a tick only for reflection symmetry and a star only for rotational symmetry.
- Answer: Reflection symmetry - no - do not add a tick; rotational symmetry - yes - add a star.
Textbook page 141 · solved item 55
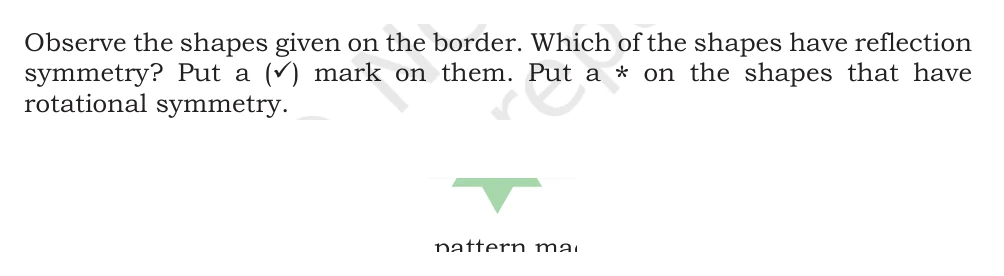
Classify the green six-point star on the page border.
Show detailed solution
- Step 1: Reflection check: Lines through opposite points divide it into matching halves.
- Step 2: Rotational check: it matches after \frac{1}{6} turn.
- Step 3: Use a tick only for reflection symmetry and a star only for rotational symmetry.
- Answer: Reflection symmetry - yes - add a tick; rotational symmetry - yes - add a star.
Textbook page 141 · solved item 56
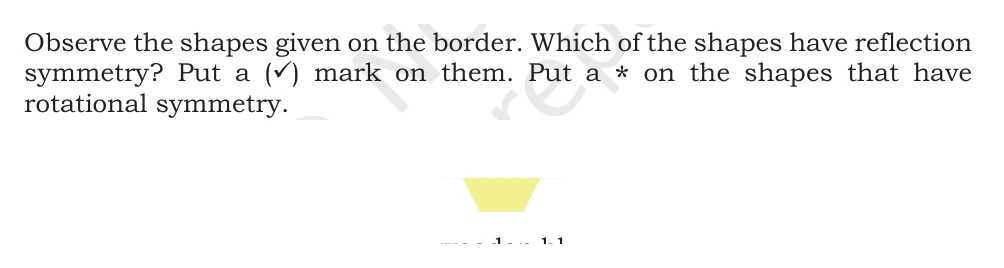
Classify the yellow regular hexagon on the page border.
Show detailed solution
- Step 1: Reflection check: Its equal sides and corners repeat evenly around the centre.
- Step 2: Rotational check: it matches after \frac{1}{6} turn.
- Step 3: Use a tick only for reflection symmetry and a star only for rotational symmetry.
- Answer: Reflection symmetry - yes - add a tick; rotational symmetry - yes - add a star.
Textbook page 141 · solved item 57
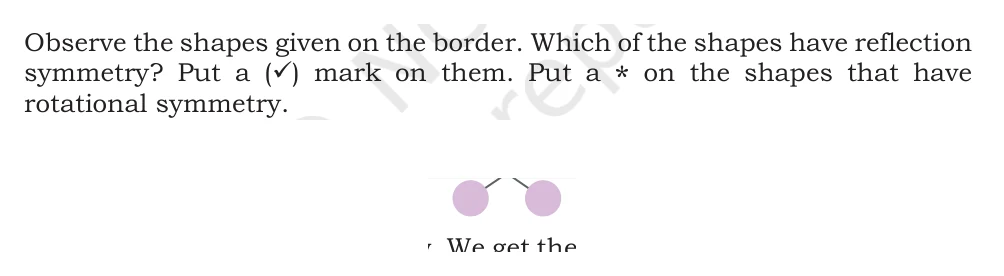
Classify the purple three-circle design on the page border.
Show detailed solution
- Step 1: Reflection check: Each arm and circle has two matching partners.
- Step 2: Rotational check: it matches after \frac{1}{3} turn.
- Step 3: Use a tick only for reflection symmetry and a star only for rotational symmetry.
- Answer: Reflection symmetry - yes - add a tick; rotational symmetry - yes - add a star.
Textbook page 141 · solved item 58
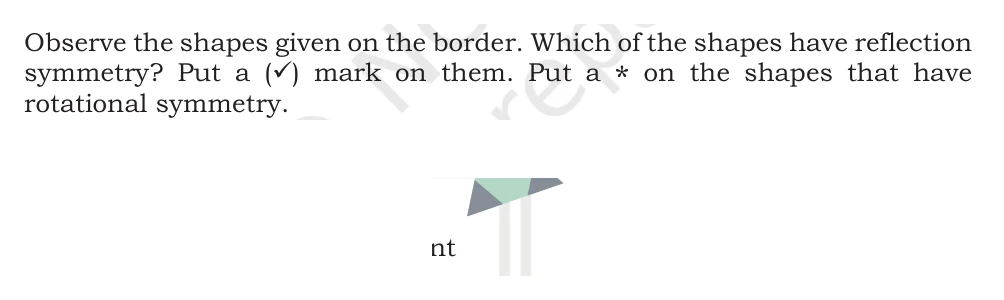
Classify the top-right green-and-grey triangle design on the page border.
Show detailed solution
- Step 1: Reflection check: A line through one grey triangle and the centre gives matching halves.
- Step 2: Rotational check: it matches after \frac{1}{3} turn.
- Step 3: Use a tick only for reflection symmetry and a star only for rotational symmetry.
- Answer: Reflection symmetry - yes - add a tick; rotational symmetry - yes - add a star.
Textbook page 141 · solved item 59
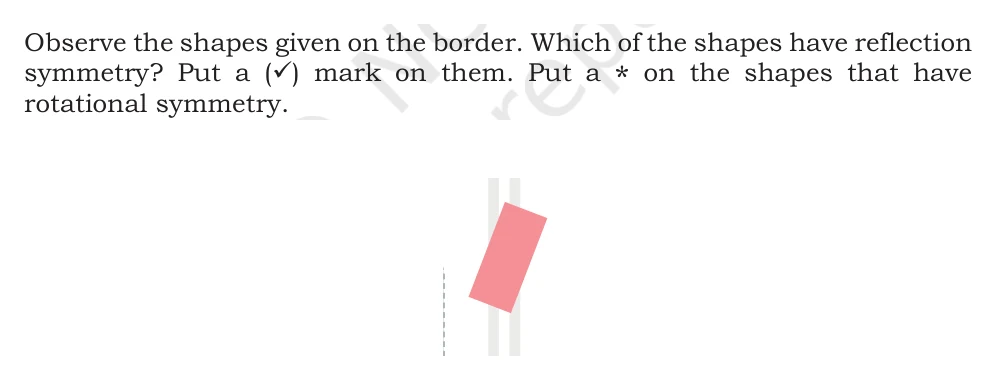
Classify the pink parallelogram on the page border.
Show detailed solution
- Step 1: Reflection check: A mirror makes the slant run the other way.
- Step 2: Rotational check: it matches after \frac{1}{2} turn.
- Step 3: Use a tick only for reflection symmetry and a star only for rotational symmetry.
- Answer: Reflection symmetry - no - do not add a tick; rotational symmetry - yes - add a star.
Textbook page 141 · solved item 60
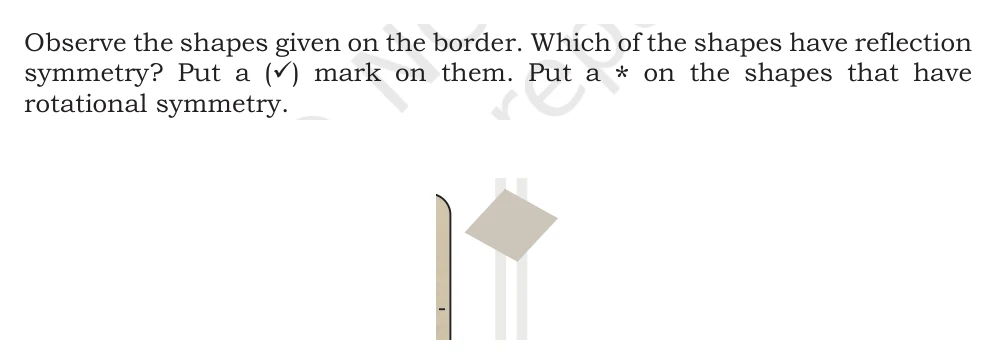
Classify the grey rhombus on the page border.
Show detailed solution
- Step 1: Reflection check: Each diagonal is a reflection line.
- Step 2: Rotational check: it matches after \frac{1}{2} turn.
- Step 3: Use a tick only for reflection symmetry and a star only for rotational symmetry.
- Answer: Reflection symmetry - yes - add a tick; rotational symmetry - yes - add a star.
Textbook page 141 · solved item 61
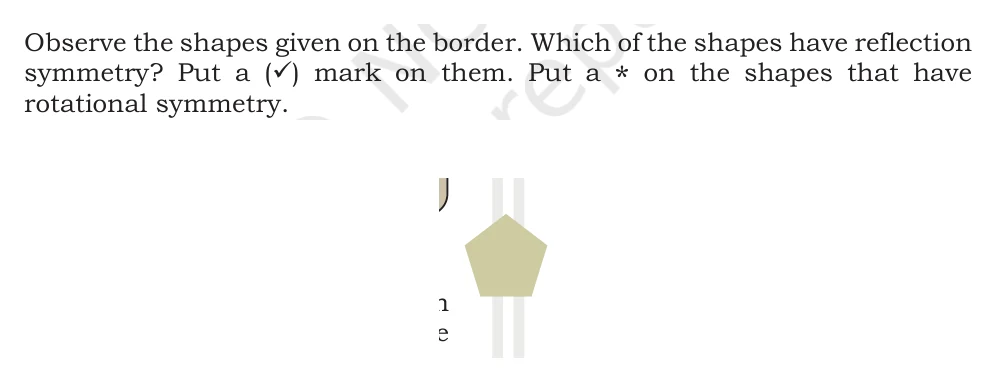
Classify the olive regular pentagon on the page border.
Show detailed solution
- Step 1: Reflection check: Lines through a corner and the opposite side's middle make matching halves.
- Step 2: Rotational check: it matches after \frac{1}{5} turn.
- Step 3: Use a tick only for reflection symmetry and a star only for rotational symmetry.
- Answer: Reflection symmetry - yes - add a tick; rotational symmetry - yes - add a star.
Textbook page 141 · solved item 62
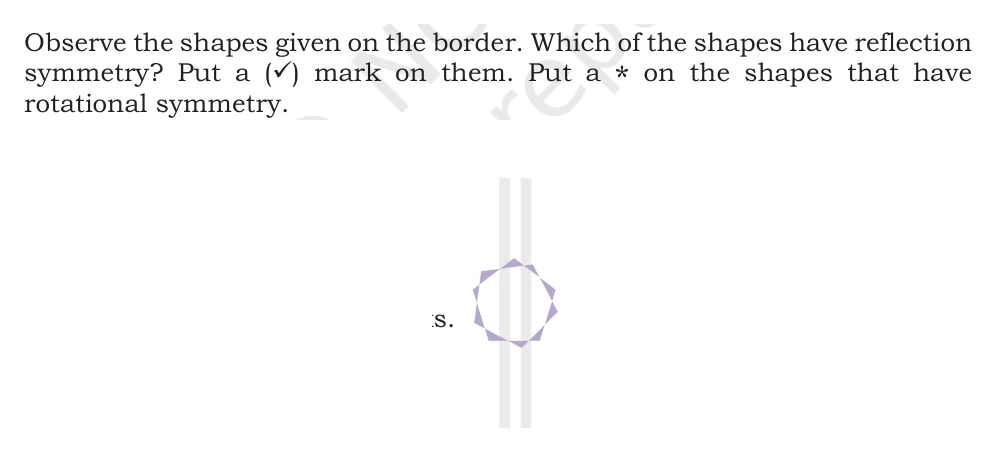
Classify the purple ten-piece ring on the page border.
Show detailed solution
- Step 1: Reflection check: A mirror reverses the ring's pinwheel direction.
- Step 2: Rotational check: it matches after \frac{1}{10} turn.
- Step 3: Use a tick only for reflection symmetry and a star only for rotational symmetry.
- Answer: Reflection symmetry - no - do not add a tick; rotational symmetry - yes - add a star.
Textbook page 141 · solved item 63
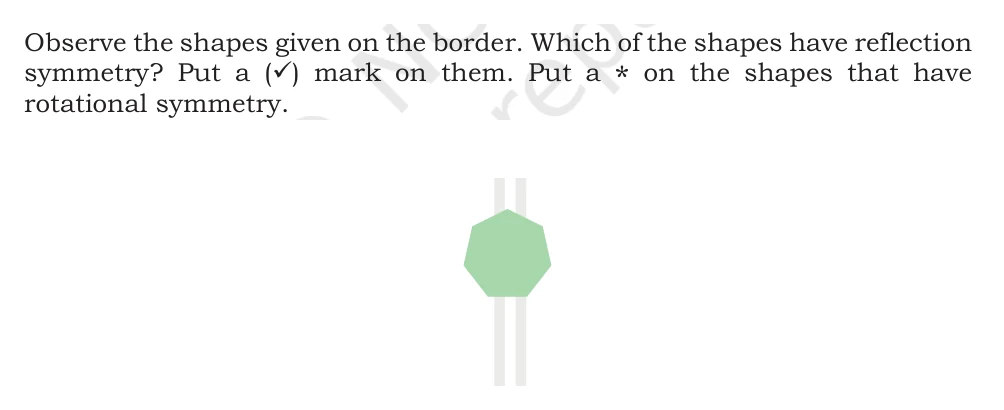
Classify the green regular seven-sided polygon on the page border.
Show detailed solution
- Step 1: Reflection check: Its equal sides repeat evenly and it has matching fold lines.
- Step 2: Rotational check: it matches after \frac{1}{7} turn.
- Step 3: Use a tick only for reflection symmetry and a star only for rotational symmetry.
- Answer: Reflection symmetry - yes - add a tick; rotational symmetry - yes - add a star.
Textbook page 141 · solved item 64
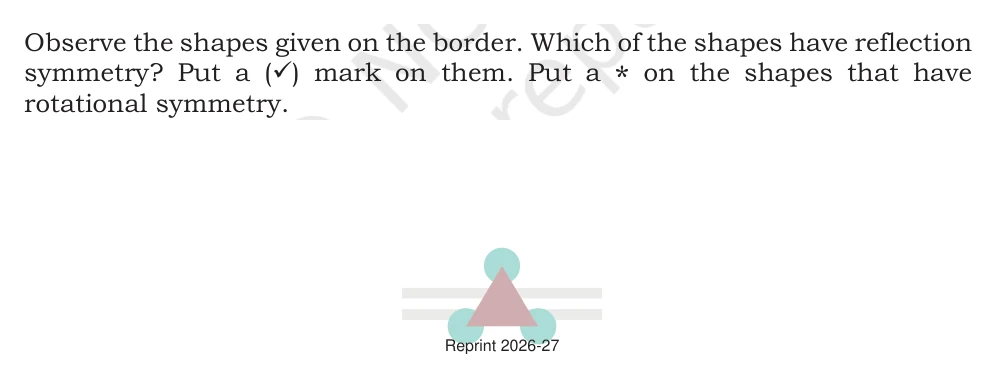
Classify the three circles and triangle design on the page border.
Show detailed solution
- Step 1: Reflection check: The three equal corners repeat around the centre.
- Step 2: Rotational check: it matches after \frac{1}{3} turn.
- Step 3: Use a tick only for reflection symmetry and a star only for rotational symmetry.
- Answer: Reflection symmetry - yes - add a tick; rotational symmetry - yes - add a star.
Textbook page 141 · solved item 65
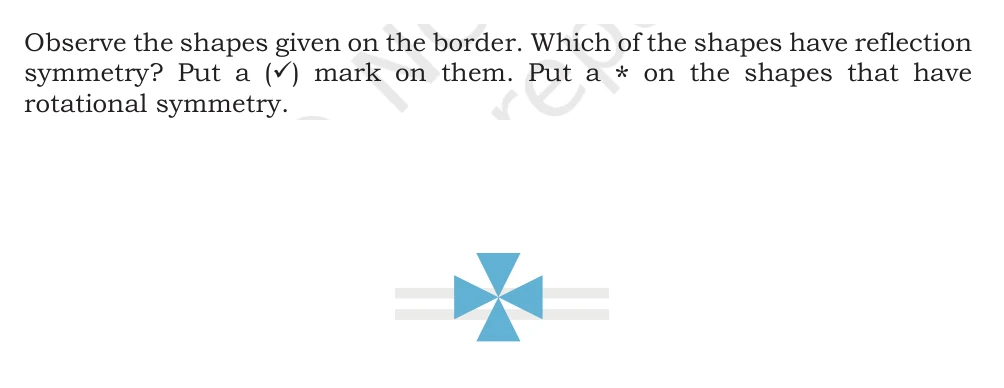
Classify the blue four-triangle design on the page border.
Show detailed solution
- Step 1: Reflection check: Horizontal, vertical, and diagonal folds pair equal triangles.
- Step 2: Rotational check: it matches after \frac{1}{4} turn.
- Step 3: Use a tick only for reflection symmetry and a star only for rotational symmetry.
- Answer: Reflection symmetry - yes - add a tick; rotational symmetry - yes - add a star.
Textbook page 141 · solved item 66
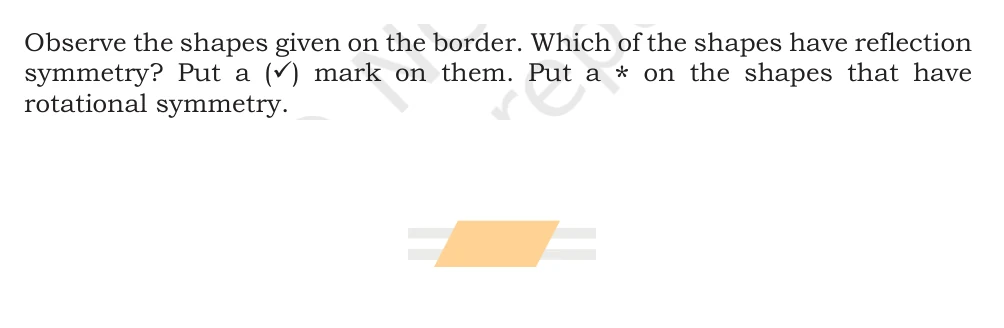
Classify the orange parallelogram on the page border.
Show detailed solution
- Step 1: Reflection check: A mirror reverses its slant.
- Step 2: Rotational check: it matches after \frac{1}{2} turn.
- Step 3: Use a tick only for reflection symmetry and a star only for rotational symmetry.
- Answer: Reflection symmetry - no - do not add a tick; rotational symmetry - yes - add a star.
Textbook page 141 · solved item 67
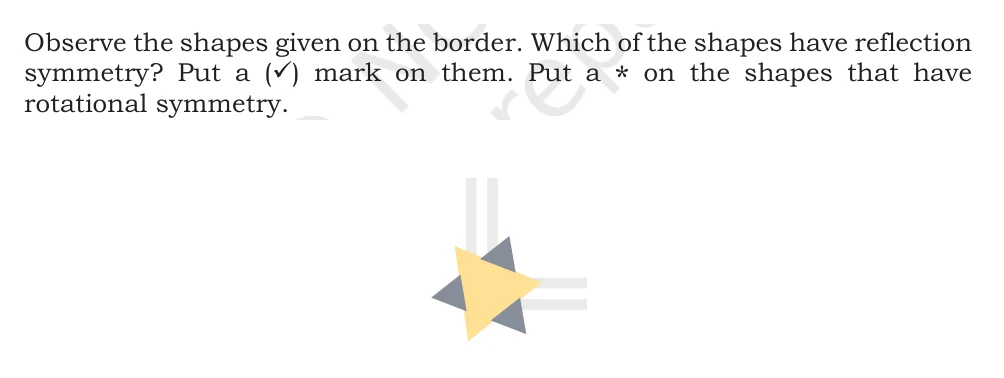
Classify the bottom-left yellow-and-grey pinwheel on the page border.
Show detailed solution
- Step 1: Reflection check: A mirror reverses the clockwise placement of the grey triangles.
- Step 2: Rotational check: it matches after \frac{1}{3} turn.
- Step 3: Use a tick only for reflection symmetry and a star only for rotational symmetry.
- Answer: Reflection symmetry - no - do not add a tick; rotational symmetry - yes - add a star.
Textbook page 141 · solved item 68
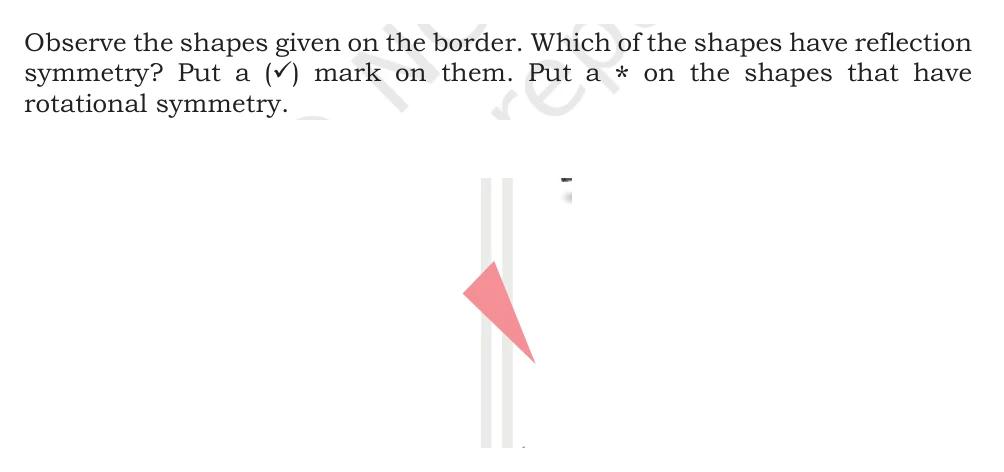
Classify the pink scalene triangle on the page border.
Show detailed solution
- Step 1: Reflection check: Its three sides are unequal, so no fold makes matching halves.
- Step 2: Rotational check: it matches after no turn smaller than a full turn, which does not count as rotational symmetry here.
- Step 3: Use a tick only for reflection symmetry and a star only for rotational symmetry.
- Answer: Reflection symmetry - no - do not add a tick; rotational symmetry - no - do not add a star.
Textbook page 141 · solved item 69
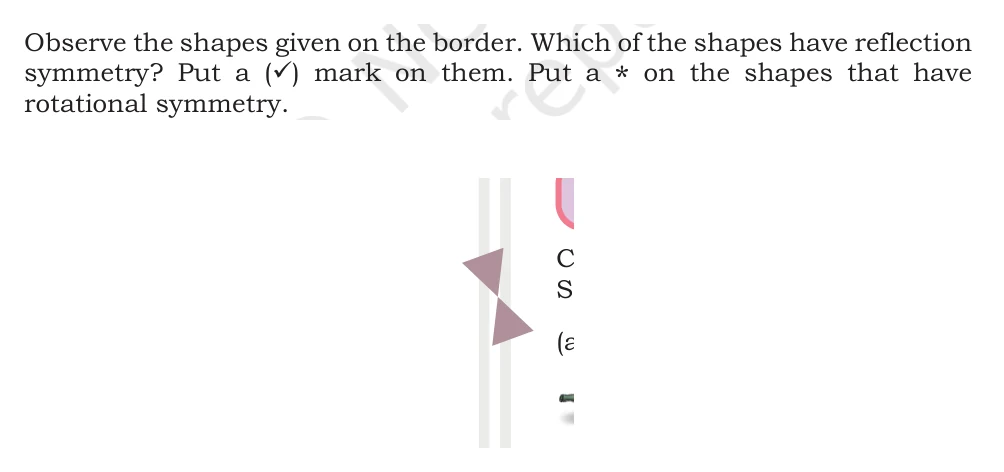
Classify the brown double-triangle design on the page border.
Show detailed solution
- Step 1: Reflection check: The two unequal-sided triangles exchange after a half turn, but no fold matches them.
- Step 2: Rotational check: it matches after \frac{1}{2} turn.
- Step 3: Use a tick only for reflection symmetry and a star only for rotational symmetry.
- Answer: Reflection symmetry - no - do not add a tick; rotational symmetry - yes - add a star.
Textbook page 141 · solved item 70
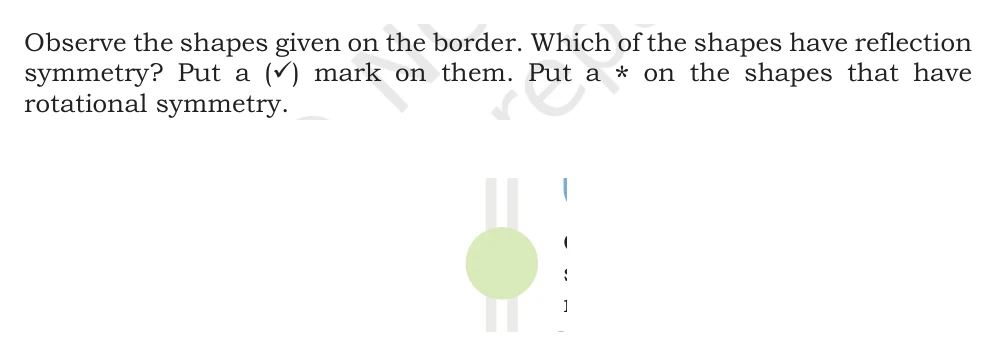
Classify the light-green circle on the page border.
Show detailed solution
- Step 1: Reflection check: Every line through its centre makes matching halves.
- Step 2: Rotational check: it matches after any turn about its centre.
- Step 3: Use a tick only for reflection symmetry and a star only for rotational symmetry.
- Answer: Reflection symmetry - yes - add a tick; rotational symmetry - yes - add a star.
Textbook page 141 · solved item 71
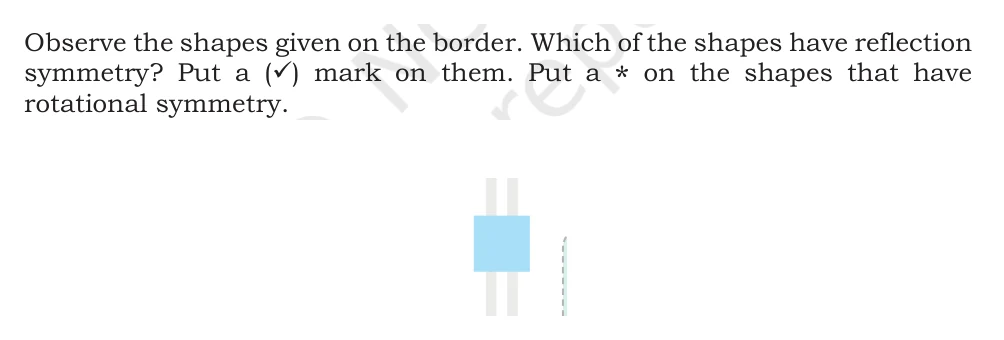
Classify the blue square on the page border.
Show detailed solution
- Step 1: Reflection check: Horizontal, vertical, and diagonal centre lines make matching halves.
- Step 2: Rotational check: it matches after \frac{1}{4} turn.
- Step 3: Use a tick only for reflection symmetry and a star only for rotational symmetry.
- Answer: Reflection symmetry - yes - add a tick; rotational symmetry - yes - add a star.
Textbook page 141 · solved item 72
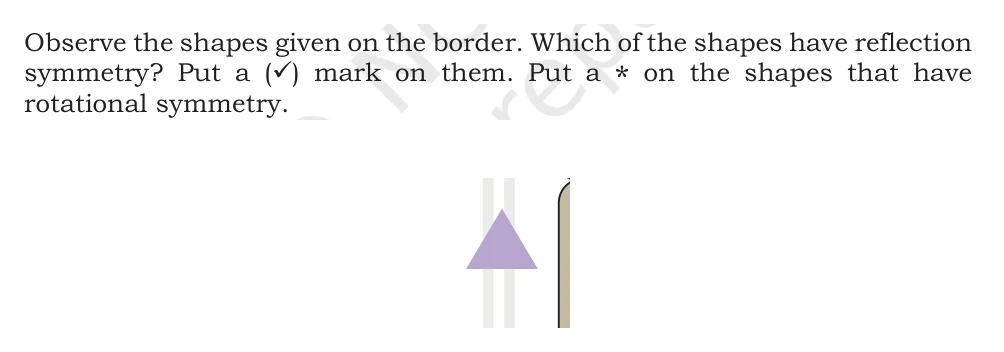
Classify the purple isosceles triangle on the page border.
Show detailed solution
- Step 1: Reflection check: A vertical fold through its top point and base middle makes matching halves.
- Step 2: Rotational check: it matches after no turn smaller than a full turn, which does not count as rotational symmetry here.
- Step 3: Use a tick only for reflection symmetry and a star only for rotational symmetry.
- Answer: Reflection symmetry - yes - add a tick; rotational symmetry - no - do not add a star.
Textbook page 141 · solved item 73
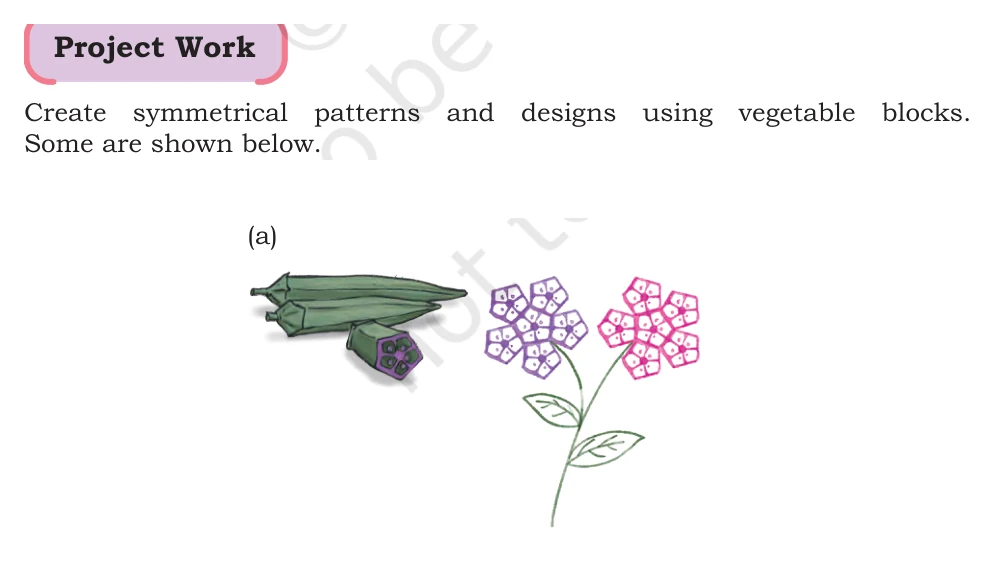
Create a symmetrical flower pattern with the okra block as shown in project (a).
Show detailed solution
- Step 1: Cut an okra carefully with an adult's help, dip the flat end in colour, and make one print.
- Step 2: Turn the block by equal amounts around a chosen flower centre and stamp at equal distances.
- Step 3: Repeat the same number of prints for each petal group so matching parts stay balanced.
- Answer: The repeated okra prints form flower heads with reflection and rotational symmetry.
Textbook page 141 · solved item 74
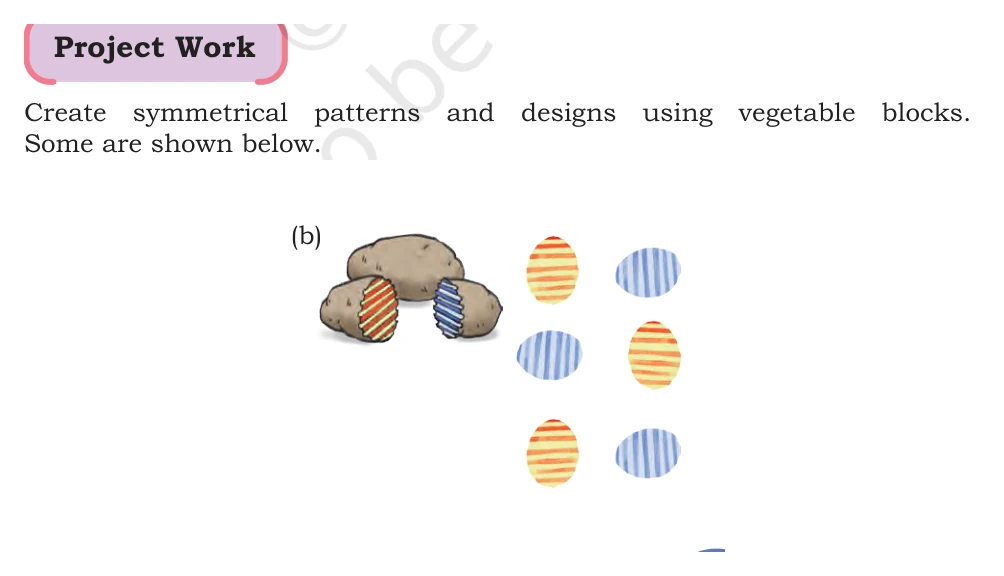
Create a symmetrical oval-print pattern with the potato blocks as shown in project (b).
Show detailed solution
- Step 1: With an adult's help, prepare two oval potato blocks and add simple stripe patterns.
- Step 2: Stamp two ovals in each row at equal distances, keeping every oval the same size.
- Step 3: Repeat the first row below the middle row so the top and bottom match across a horizontal fold line.
- Answer: The six-print arrangement has horizontal reflection symmetry.